|
Astrophotography |
|||||||||||||
|
Hello and welcome to my astrophotography pages. I have created these pages to join the amazing boom in astrophotography. It is my belief that the recent improvements in telescope technologies have finally made photography a reasonable study for the amateur and semiprofessional. Specifically, I would suggest these developments have made the difference:
It is also my feeling that modern amateur astrophotos have now surpassed astrophotography by the great astronomical centers of the world from as recently as the 80s. Some modern CCD sensors on the market today are competitive with the original sensors in the Hubble Space Telescope!
|
|||||||||||||
|
FIRST "FIRST LIGHT" - I have had an interest in astronomy for as long as I can remember. I built my first telescope in high school. My first scope started with a 50mm f/24 lens ( that is not f/2.4, it is f/24! ) from Edmund. I managed to find a length of aluminum tubing and an old binocular eyepiece and fit them together using tape and plumbing supplies. My "first light" experience was from my family's front lawn trying to find Saturn. The scope was on a cheap wooden tripod and eventually I found Saturn as a quick streak of light across the tiny field of view of my eyepiece. Eventually I was able to find Saturn and to stop the scope from moving long enough to focus the image. What I saw was astonishing to a 17 year old kid...it was Saturn in all its glory! I will never forget that view...that moment when I visited Saturn for the first time. That experience changed me forever and to this day when I see Saturn I think of that summer night on the front lawn - with family behind me lined up to look. |
|||||||||||||
EARLY
ASTROPHOTOGRAPHY
- Over
the years I have dabbled in astronomy and astrophotography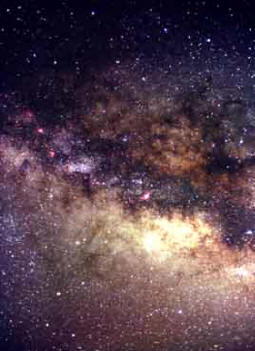 but the
days of film astrophotography were slow and painful. I had to guide
by hand and I could not see the images until I got the film to a
developer and very carefully explained that the extremely thin
images were worth printing and still got terrible results from
professional machine developers. but the
days of film astrophotography were slow and painful. I had to guide
by hand and I could not see the images until I got the film to a
developer and very carefully explained that the extremely thin
images were worth printing and still got terrible results from
professional machine developers.
This photo is of the Sagittarius region. It is taken with a Nikon film camera, hand guided, with a f/1.4 lens wide open. This image represented the best I could do at the time. This was taken in 1989 in the high desert of California on a very cold night. Each photo is a single exposure and usually exposed for about 20 minutes on ASA 800 Fuji film. Guiding was by the use of a guide scope through which I tracked a guide star by hand using a 4 direction pad controlling the scope and piggyback camera arrangement. This image looks good but it is very crude by today's standards. Stars in the corners are streaked as if the image is moving - which it is. I found that the camera rotated with respect to the guide scope causing the extreme corners to move in the image. Each photo took hours to set up and expose. The process of aligning the guide scope, the telescope, and the camera was very time consuming. I could only take 4 images a night. Guiding was tedious. Each exposure took total concentration. And the guide process was not accurate depending on the focal length ratio between the camera and the guide scope. This is where I decided that guide scope should be 10 times the focal length of the camera thus making the guide error one tenth of the camera error. Image processing consisted of scanning a single developed negative. Transferring it to a crude program called Photoshop and hoping for the best. |
|||||||||||||
 ENTER
THE CCD
- In
the early 90s I heard about CCD photography and bought the first
SBIG CCD system - the ST4. I also bought a C-8 from Celestron. I was
never happy with the C8 but not for lack of trying. ENTER
THE CCD
- In
the early 90s I heard about CCD photography and bought the first
SBIG CCD system - the ST4. I also bought a C-8 from Celestron. I was
never happy with the C8 but not for lack of trying.
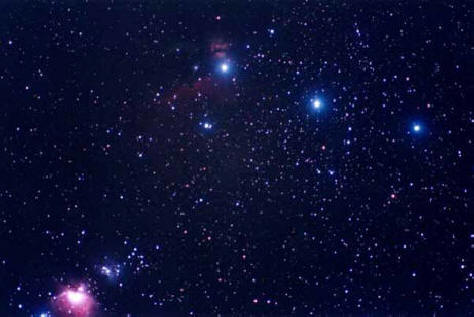
In the mid nineties I bought an Astrophysics AP155. It was after the first look through the AP that I realized why I did not like the Celestron C-8. It was also the moment I realized I was doomed to spend a lot of money on astrophotography. I made my first guided photos with the ST4 and the AP. The scope was wonderful but The photos were still a fair amount of work. Trying to find the guide star on the tiny ST4 CCD was a major undertaking. I gave up on ST4 CCD photography because of the technical time of setup and the expense of the new SBIG 500 x 700 super camera. This image of Orion was ST4 guided and exposed for 20 minutes using a camera with a 200 mm lens piggy-back on the AP 155 scope. The quality of this image was ok for the time but not good enough for me. I knew that lenses of the 90s were better than this image. Too much time was being lost in the technical process of photography. For every 1 minute I was looking up, I spent 15 minutes looking down setting up equipment! |
|||||||||||||
|
MODERN TIMES
- In
2007 I tried a Canon 20D which I modified myself and the results are
amazing! CCD photography was finally simplifying the technical
process enough for me to concentrate on astronomy and not the
technical setup of my equipment.
This change has brought astrophotography back into my life. For the modest cost of $400 for an eBay used camera I now have an excellent 6 mega pixel CCD system. I also bought a simple Philips ToUcam and I have adapted it with the help of PHD guide software into a reliable and simple guide system. Thank you Craig Stark!!! I have returned astrophotography and for the first time I am spending more time on astronomy and less on setup. A Quick Note On Camera Modifications For Astrophotography I tried the Fuji S3 and the Nikon D300 in astrophotography. I actually converted an old Fuji S3 and still got marginal H-alpha results. After taking the Canon 20D and Fuji S3 apart I found a world of difference in the noise shielding. The Canon 20D has a far better shielding design. While I did not take my Nikon D300 apart, my personal testing at all ISO settings indicated that the Nikon was noisier than the Canon 20D. For astrophotography I am a total convert to the Canon camera design, engineering, and assembly. But I am a "nikonian" in standard photography and have been for years. For anyone who is thinking of modifying their own camera it should be said that the modification is possible but complex. The other problem with this mod is trying to keep the new glass filter and CCD clean during the modification. This is an extremely important consideration. When I installed the filter I was fanatic about working in as clean an area as possible and covering the CCD during surgery at all times. A true clean room is a better solution but not possible if you have a dog like a Golden Retriever who is there to help. A single tiny particle on the glass or CCD will show up as a vague black spot on every photo. And if the particle is between the glass filter and the CCD the only solution is to take the camera apart again, clean every optical part, reassemble the camera, and try again. Canned dry "air" is essential - but some gasses leave a residue if you tilt the can so that liquid hits the area you are cleaning. This is particularly likely if you are cleaning the CCD in the Camera. The residue must then be cleaned off the glass with a solvent and optical wipes and then the particles blown away again. I used a clear glass filter over my first Canon 20D. The clear glass allows me to photograph in the infrared region if I choose to do so. But, if I want to cut off infrared above 700 microns I must use a infrared cutoff filter on any scope or lens in front of the CCD. The Tiffen Hot Mirror works well for this application but must be put on every lens as a filter. On my second Canon 20D, I used a Baader Planetarium pre-sized infrared cutoff filter. It is an excellent filter and available at a reasonable cost. The Baader filter eliminates the use of an IR cutoff filter on every lens and reduces the extra glass in front of the CCD. I found that some filters cause reflections on the image. I bought my Canon 20D filter listed here as - "Imaging Filters, Canon EOS DSLR Filters" : http://www.alpineastro.com/filters/filters.htm#DSLR%20Filters The is an excellent filter and is an exact replacement, in size, for the Canon filter. I strongly recommend this solution over trying to buy optical glass from Edmond and cutting it yourself. Cutting your own filer is simply not worth the effort!!! Cutting and then trying to clean the cut piece is more difficult than it sounds and I have good equipment to do the work.
|
|||||||||||||
|
EQUIPMENT
My present
system consists of:
Astro-Physics 155 @ f/7 [ 1085mm @ f/7, 813mm @ f./5.5 ] Questar 700 (700mm f/8 Questar, originally designed for long lens photography) [ 700mm @ f/8 ] APM/TMB 105/650 @ f/6.2 LZOS optics [ 650mm @ f/6.2, 552mm @ f/5.3 ] Stellarvue SV90 f/7 (LOMO Optics) [ 630mm @ f/7, 535mm@ f/5.95 ] Nikon 80-200mm f/2.8 ED zoom [ 80 to 200mm ] Zeiss Planer 50mm f/1.7 [ 50mm ] (Celestron C8, C5 - From early astronomy days)
2 Canon 20Ds modified - Primary (with infrared cutoff filter) and backup (with clear glass filter)
- Tiffen Standard Hot Mirror (filters infrared beyond 700 nm)
- IDAS filter (sky pollution) - Adapted H-alpha
- PHD guide software - Adobe Photoshop CS5 - Adobe Lightroom 3 - DeepSkyStacker - Stellarium
When I am at home near San Francisco, I use a network where I have a telescope laptop PC networked wirelessly to my main computer in my house. The network allows me to start the basic telescope systems at the scope and then to control the scope, monitor the photography, transfer images, and process images in my house. What a change from the film days! |
|||||||||||||
ASTROPHOTOGRAPHS - I have always had an interest in wide angle photography of stars so most of my photography is biased in that direction. I tend to enjoy the wide view of astronomy. My astro work seems to show that bias. I look at a photograph an aesthetic as much as a technical event. I like to present an image in astronomy from the angle I think is best rather than the view we might have here on earth...or our view of the sky. As an example I like to look at the California Nebula as a cloud we are approaching rather than the vertical view we see from a standing position looking up. Astrophotography is a dynamic process. It probably is changing faster then any technology I know. I am just now developing images that I am satisfied with. But it will probably be that the very images I like now will soon be old or crude or I will have a better version. And I hope the process does continue to develop and improve...that would be exciting! |
|||||||||||||
|
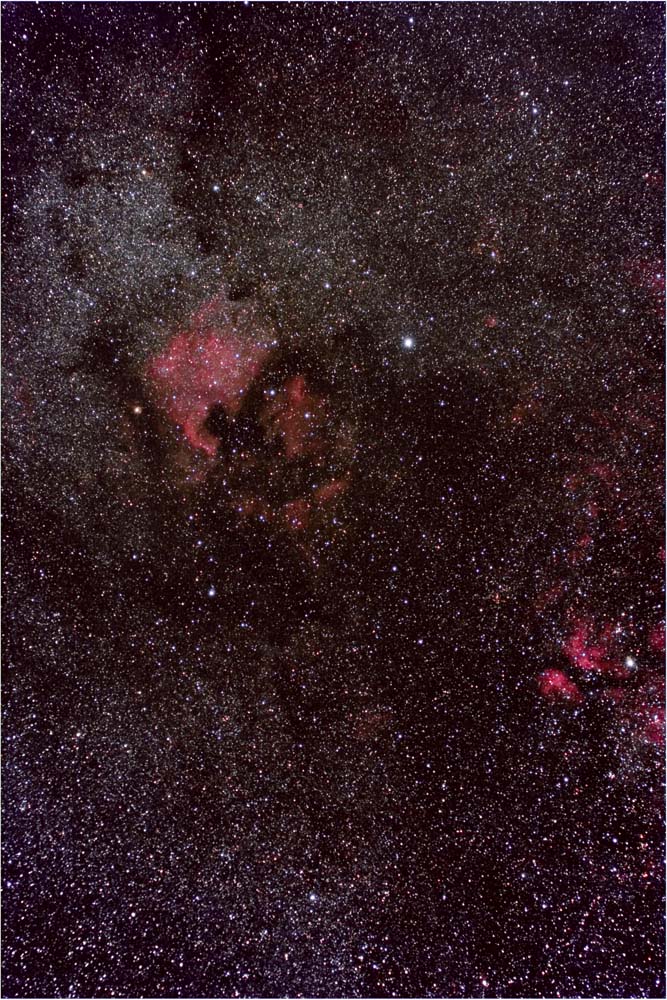
COMMENTS:
This is
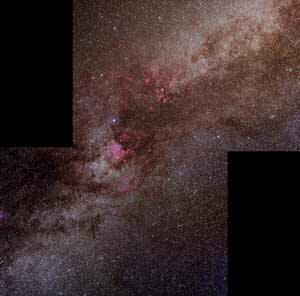
Cygnus and the North America Nebula! I always photograph this and it
has become my test and standard of quality. The Nikon lens continues
to amaze me. The clarity and color correction is perfect. I am
pleased with this image. It represents a giant change in technology,
an improvement in my photography, and a place of beauty to visit in
the night sky. You can now see the extreme difference in quality
between my Sagittarius photo above and this photo and even more so
in the composite below. There is no more than 3 percent cropping to
the edges of this image. |
|||||||||||||
|
IMAGE
Camera: |
DETAILS
Canon 20D
Modified
Notes: |
 (Click on the image for a larger image) |
|||||||||||
|
|
|||||||||||||
|
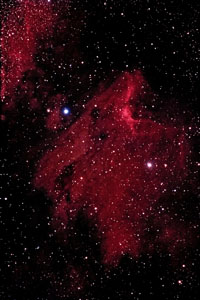
Pelican Nebula - Cygnus - NEW IMAGE COMMENTS: This is a photo of the Pelican nebula in the Cygnus complex of nebulae. This is the small red area to the right of the North American Nebula ( just off the coast of Florida ) in the photo above taken with the more powerful APM scope. |
(Click on the image for a larger image) |
||||||||||||
|
IMAGE
Camera: |
DETAILS
Canon 20D
Modified
Notes: This is a full
frame image from the Canon 20D modified - this image is uncropped -
the original image is 3072 x 2048 pixels.
|
||||||||||||
|
|
|||||||||||||
|
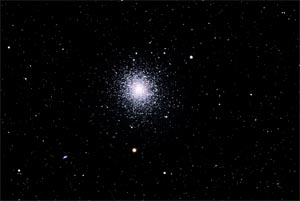
M 13 and NGC 6207 - NEW IMAGE COMMENTS: This is one of my new images resulting from the year of work I have put into understanding focus and the use of new focus tools available. |
(Click on the image for a larger image) |
||||||||||||
|
IMAGE
Camera: |
DETAILS
Canon 20D
Modified
Notes: This is a full
frame image from the Canon 20D modified - this image is uncropped -
the original image is 3072 x 2048 pixels.
|
||||||||||||
|
|
|||||||||||||
|
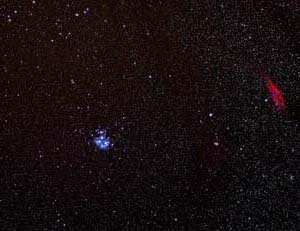
Pleiades and the California Nebula ( Jewels in the Night Sky )
COMMENTS:
This was
an amazing accidental photo. My wife and I were camping in a
semi-desert area on the back side of Mono Lake and I was up all
night collecting images. I had finished most of my work when I saw
Pleiades rising to the south east. I thought I would make a quick
very wide angle shot with my Zeiss 50mm and this is the photo. What
a surprise when I saw that I had captured the California Nebula as
well. This to me, is an example of the aesthetic beauty in
astrophotography as well as the science. The contrasting jewel tones
side by side are simply beautiful! This location is at 7000 feet and
the nearest light is a very small town 75 miles to the south. This
area is only accessible by 4-wheel drive. A perfect place for
astrophotography. This is a single 10 minute exposure! |
 (Click on the image for a larger image) |
||||||||||||
|
IMAGE
Camera:
|
DETAILS
Canon 20D
Modified Notes: |
||||||||||||
|
|
|||||||||||||
|
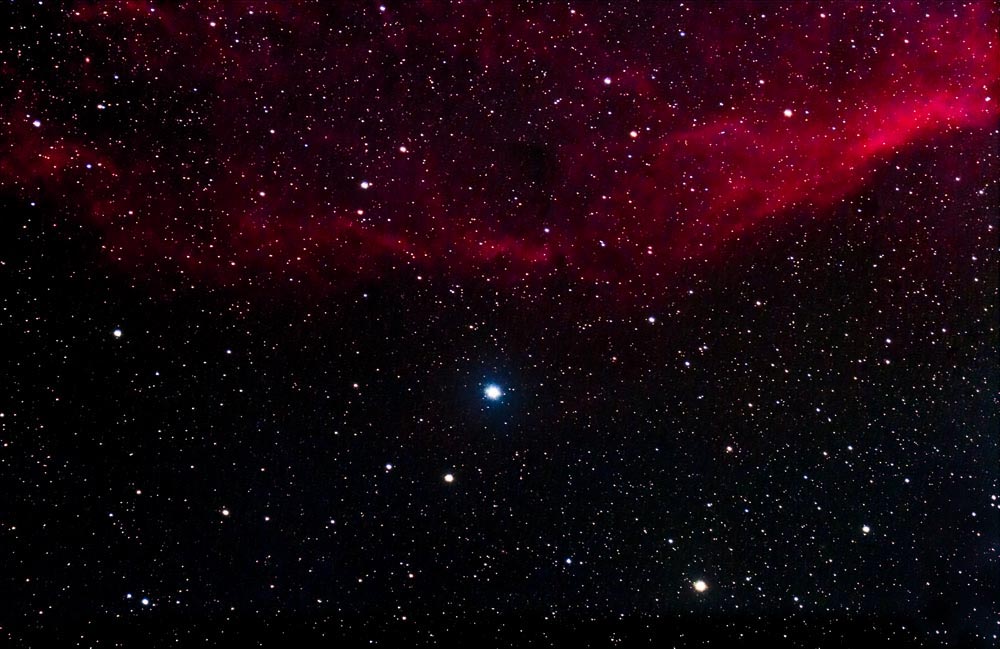
COMMENTS: This image shows the amazing quality of the Questar 700 optics. This Questar is a Maksutov Cassegrain design with a reducer/flattener built into the optical path. The result is an f/8 system that is very flat and extremely well color corrected. Exposure needs to be as long as possible (about 8 minutes) and is at the upper limit for CCD time exposures in high pollution area like the SF Bay Area because of background light contamination. If you look at the star detail you will see extreme color quality and sharpness to the corners (this image is full frame - no cropping). The focus of this lens is also quite simple. The focus is not nearly as delicate as the F/6 refractors apos and focus equations show that. This is an old lens from the 80s but produces a quality image equivalent to modern apos - it is am amazing 30 year old Questar product. |
(Click on the image for a larger image) |
||||||||||||
|
IMAGE
Camera: |
DETAILS
Canon 20D
Modified |
||||||||||||
|
|
|||||||||||||
|
COMMENTS: My goal on my Mono Lake trip was to see if I could start a milky way composite. I wanted to take a number of photos and see if I could combine them into a more complex image. This photo is the combination of two images. Each image is the summation of 4 images, each exposed for 8 minutes. The results are here - a proof of concept. This is a complex project but still a hope over time. I would like to make a milky way composite of at least the North American portion of the milky way. I know this has been very well done already but it has proven to be so much fun and what a challenge! The "larger image" choice to the right is 300k and that is a highly condensed version of the TIFF original - around 100 Mbytes. Among other things, I will need an easier way to rotate my camera on my drive. there is no cropping to this image except to fit the two images together. The Zeiss lens is simply amazing. |
 (Click on the image for a larger image) |
||||||||||||
|
IMAGE
Camera: |
DETAILS
Canon 20D
Modified Notes: This photo is about 4600 x 4600 pixels |
||||||||||||
|
|
|||||||||||||
|
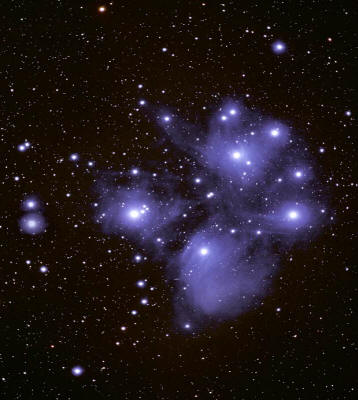
The Pleiades (M45) COMMENTS: This is a recent image of M-45 taken with the APM 105/650 with a Televue .85x reducer/flattener. There is more work to do with this image before I post a full size version. |
|
||||||||||||
|
IMAGE
Camera: |
DETAILS
Canon 20D
Modified Notes: Because the .85x flattener/reducer was used on the APM scope this photo is at - 105/522 mm @ f/5.3 - A very fast scope. |
||||||||||||
|
|
|||||||||||||
|
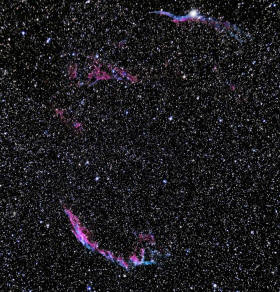
The Veil Nebula
COMMENTS: Last image of the night - it was cold! The Mono Lake area is a high desert. The altitude is just under 7000 feet. The temperatures reached 95 during the day and the mid 20s in the predawn morning. The CCD did well at this temperature but I did not. This is a supernova remnant in Cygnus and what a beautiful area of the night sky for a camera. This wide angle image shows the circular structure of the nebula. |
(Click on the image for a larger image)
|
||||||||||||
|
IMAGE
Camera: |
DETAILS
Canon 20D
Modified Notes: There is a focus problem in the corners. This photo was taken at 3 AM and it was very cold so any image at the time was a good image. Warming up was becoming more important than good focus. |
||||||||||||
|
|
|||||||||||||
|
APM Telescope - This is where I got my amazing 105/630 LZOS scope. The 105/630 is still available in Europe. http://apmamerica.com/index.php?main_page=index&cPath=1_3 Rigel Systems - Rigel makes one of the best precision focus stepper motor systems in the business. I use this stepper to place my CCD in the focal plane with a consistent five micron accuracy. http://www.rigelsys.com/ GoldFocus - This is an excellent automated focus mask system. I am using it now as an essential focus system for my scopes. I routinely use this system to focus to 20 microns and better depending on the seeing conditions. http://www.goldastro.com/goldfocus/ DeepSkyStacker - I use this to register and sometimes to develop my images - an excellent and free program. http://deepskystacker.free.fr/english/index.html PHD guiding software - a great program and free! http://www.stark-labs.com/phdguiding.html ImageJ is an image analysis program and it offers a range of tools to examine an image pixel by pixel. I often use it to measure the FWHM of a star in an image. I used it extensively in my focus paper - and the program is free! I highly recommend it. http://rsbweb.nih.gov/ij/features.html Alpine Astronomical has an excellent range of astrophotography accessories. This is where I got my Canon 20D far infrared filter to modify one of my cameras. http://www.alpineastro.com/filters/filters.htm#DSLR%20Filters Back to Website Contents |
|||||||||||||
|
|
|||||||||||||
|
|
|||||||||||||
 I have just completed an
article for ATT Magazine paper titled "Understanding The Critical Focus Zone Of A Fast Apochromatic Lens"
I have just completed an
article for ATT Magazine paper titled "Understanding The Critical Focus Zone Of A Fast Apochromatic Lens"